Stream TV Tutorials
We created a step by step tutorials to help you install your Stream Digital TV subscription Line in your preferred devices.
Stream TV Setup of Smarter Player on your Device
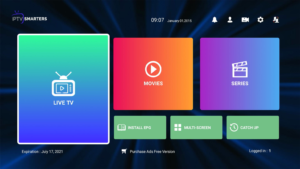
Android (Smartphone/Android Box)

How it works?
- Install the Application IPTV Smarters Pro. (Download from the Google Play or open your browser and type in https://www.iptvsmarters.com/smarters.apk)
- Once installed, simply enter your username, password and URL to enjoy watching the latest videos (movies and series) on all channels updated weekly.
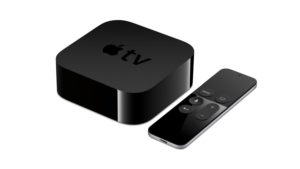
IOS (Apple TV / iPhone / iPad)

Amazon Fire TV / Stick / Cube
Personal Computers (Windows / MAC OS X)
Nvidia Shield TV / Cube
Formuler Z7/Z8 Box

MAG “All Models”
This tutorial will guide you through the simple setup instruction for a LG Smart TV. The Live TV Store service uses a media controller app called ‘Smart IPTV’, this app is free to use for a period of seven days, you will then be asked to make a one time donation of €5.49 (Euros) towards the Smart IPTV app development.
1. In order to check if your Smart TV is compatible with the Live TV Service go to the Smart TV screen and search for the ‘Smart IPTV’ app. If the app is not displayed on the main screen you may have to search for it in ‘All Apps’ or ‘Updates’.
2. Launch the ‘Smart TV’ app.
3. Make a note of the ‘MAC Address’ which is displayed on the screen.
4. Go to http://siptv.eu/mylist/ from any web browser.
5. Go to the section titled ‘Add external playlist links (URLs)’ and enter your ‘Mac’ address and the unique Live TV Playlist URL into the ‘Link’ field.
6. Ensure the ‘countries’ dropdown selection on ‘Various’.
7. If you have any problems with the playlist loading you can place a check in the ‘Save online’ checkbox.
8. Click onto the ‘Add Link’ button.
9. Restart the ‘Smart IPTV’ app.
1. Open the Google Play Store.
2. In the Google Play Store, go to the Search bar which located on the top of the screen.
3. Enter IPTV in the Search box to search IPTV apps.
4. List of IPTV players will appear on the screen where you have to select GSE SMART IPTV (One of the best and highly used IPTV app by the people).
5. Click the Install button to start the installation procedure.
6. After the installation gets completed tap Open to launch the IPTV app on Android Device.
7. Click the Add Playlist button.
8. Then click the Remote Playlist File.
9. Enter the M3U Playlist URL which is provided by us and type the name of the Playlist. Then select the days for Channel Refresh and EPG Refresh. After entering the details click the Save button.
10. Wait until the application loads all the channels. Now you can enjoy all your favorite channels with your family and friends.
1. Make sure your MAC address was sent by email or whatsapp.
2. When the box is being loaded the main portal screen appears. After that click on “settings”, press remote button “SETUP/SET”.
3. Go to the Setting menu. Click on System settings and click on “Servers”
4. Select “Portals“
5. In the “Portal 1 name” line enter the name of sever LuXtream.
6. In the “Portal 1 URL” enter the portal address that we send it to you. Please double check all characte.
7. When all the operations listed above is done, then press “OK”.
8. When all the steps listed above are done press”EXIT” 2 times on the remote control and restart the portal, Now everything is ready to start watching Live TV.
1. Download MyTVOnline 2 to connect with our service.
2. You have two options: add a portal or m3u (URL) playlist. You can set the nickname to any name you prefer.
3. Click “Connect”. Wait for a few minutes to connect to our service and you will receive all the channels associated with your account.
1. From the Main Menu scroll to hover over Settings.
2. Click My Fire TV.
3. Choose Developer Options.
4. Click Apps from Unknown Sources.
5. Choose Turn On.
6. Return to the home screen and hover over the Search icon.
7. Type in “Downloader”.
8. Select the Downloader app.
9. Click Download & Click on Open.
10. Select Allow if presented with this prompt & click OK.
11. Type the following URL exactly as shown here: https://bit.ly/32HqzSz and click Go.
12. Wait for file to download.
13. Click Install.
14. Return to device home-screen and under “Your Apps & Channels” click See All.
15. Scroll down to hover over IPTV Smarters.
16. Click on Menu button on remote (3 horizontal lines), then click Move to Front.
17. When the App installation is complete open it.
18. Click Add New User
19. Choose login with Xtream Codes API
20. Enter your subscription information and click Add User
21. Wait for User added successfully message to appear
22. Click your Profile and enjoy!
1. This is instruction For Enigma 2/ Linux installation, you need install putty to use it.
Settings > Setup > System Network Device > Setup Adapter > Settings
And get your IP address it starts with 192.168….
2. Go to your windows PC and Download Putty Software.
3. Open Putty
4. Add your IP address of your Device.
5. Add Port 23
6. Click on open
7. Your default login and password are root
8. Copy your line ( you will get it after you order your subscription )
wget -O /etc/enigma2/iptv.sh “your m3u link” && chmod 777 /etc/enigma2/iptv.sh && /etc/enigma2/iptv.sh
9. RIGHT CLICK MOUSE BUTTON after you enter your line press ENTER
10. Type reboot and your device will restart.
Download VLC media player from google and follow the steps and Install VLC Media Player.
After you download and install VLC base on your Operating system you can start setup steps.
Step 1: When the application is opened press on “Media“.
Step 2: Click on the “Open network stream“.
Step 3: Enter the M3U URL provided by your IPTV distributor and press “Play“.
Step 4: Now your playlist is loaded, Press the combination between CTRL+L to bring up the playlist.
Here you can choose or search for your desired channel and start watching Live TV
How to install and set up VLC in good way:
1) First, Download and install VLC Media Player
2) After installing VLC open the Preferences tab from the Tools Menu. (CTRL+P or Command+P on MAC)
3) In the Preferences window choose the “All” Radio button below “Show Settings”
4) You shoud now see a advanced view like shown below, now navigate to the FFmpeg Settings.
5) The FFmpeg Settings are located in the “Video codes” subgroup
6) Make sure Hardware decoding is set to “Disable”
7) Now Navigate back to Input / Codecs and scroll down to the end of the page
You shoud find “Network Caching” set this to 3000.
8) Scroll up a bit till you find the “Network Settings” under “Network Settings” find “MTU of the network interface”
9) Set “MTU of the network interface” to either 1500 for Cable or 1498 for ADSL
10) After setting the MTU press “Save” and close the window.
VLC needs to be restarted to make the changes we did work.(CTRL+Q or Command Q on MAC)
1) Open up VLC Media Player again.
2) Now you have to load your GenIPTV Playlist. There are 2 diffrent ways to do it:
2.1) Copy the playlist URL to your clipboard (CTRL + C or command + C on MAC)
and choose “Open Locaction from clipboard via the Media Tab in the top left(Shortcut : CTRL + V or command + V on MAC)
Insert your URL link that you got from us now like this: http://portal.URL:25461/get.php?…
Please note that the output in vlc needs to be “ts” (output=ts) rather than “m3u8”.
2.2) Simply Drag & Drop the downloaded m3u file into your VLC or open it via Media > Open File > “Choose your .m3u file”
You now shoud be able to watch IPTV.
Inorder to switch Channels go to “View” in the Menu strip and navigate to “Playlist”(CTRL + L or command + L on MAC)
You will now see a list of Channels available to choose from you can use the search function to find a Channel.
- Open Kodi
- Select SYSTEM
- Select TV (or Live TV if you are on a version lower than 15.2 and if you are then consider updating)
- Select General
- Select EnabledYou will now see a pop-up saying that you have no PVR Client enabled.
- Select OK
- Scroll down and select PVR IPTV Simple Client
- Select Enable
- Select Configure
- In General select M3U PlayList URL
- Add your M3U URL into the address section
- Select OK
- Select OK again
- Reboot Kodi
- On your Home Screen, you should now see TV (or Live TV if on an older version of Kodi).
- Open that to see the live channel list
This tutorial will guide you through the simple setup instruction for Dreamlink T1, T1+, T2, T6.
- Obtaining MAC address from the device:
- Let the STB Boot Up.
- Finish any update that it may find.
- It will bring you to the ‘Server menu’.
- Press the ‘Exit’ button on the remote control and click on ‘OK’.
- This will bring you to the main DOL screen, the ‘MAC address’ is in the upper right corner
- Dreamlink T1, T1+, T2, T6 Setup Instructions:
- In ‘Dreamlink On Line (DOL) go to ‘Settings’.
- Press the ‘Green’ button on your remote control to pull up the ‘Edit’ option.
- Enter your ‘Portal name’ (use for example: ‘IPTV Point’).
- enter your ‘Portal URL’ (Check your activation e-mail).
- Confirm, restart ‘Dreamlink’ and start watching.
Troubleshooting Dreamlink T1, T1+, T2, T6
If you have any problems viewing the Channels please follow this recommended fix:
Restart your Dreamlink and Wi-Fi Router.
TVOnline Setup Instructions:
- From home screen click ‘Market’.
- Click ‘TvOnline’ app.
- Install ‘TVOnline’ app.
- Wait for the installation to finish.
- Enter ‘Server name’ (for example ‘IPTV Point’) and enter ‘Portal link’ (Check your activation e-mail).
- Click ‘Connect’ to start watching. Troubleshooting Avov Box/Formuler If you have any problems viewing the Channels please follow this recommended fix: Restart your App, Avov Box/Formuler, and Wi-Fi Router.
PC/ MAC OS X Setup:
- Download our application ( Download URL Link ) (updated)
- Open Application
- Fill the form with login details, Name, Username, Password, URL.
- Wait till all the Channels load (this may take some time) Choose a Channel and enjoy the show
Apple ( Apple TV / iPhone / iPad )
Using IPTV-Smarters Player Step
- Download IPTV-Smarters Player from AppStore
- Fill the form with login details, Name, Username, Password, URL.
- Now you can enjoy our IPTV playlist
- Open any internet browser.
- Copy the M3U URL you receive in the email to address bar and enter.
- Now you will be asked to save it.
- You can save it.
- Then you will be able to copy the saved file to a USB box.
- You can plug the USB to your device.
- Now you should visit menu and local settings on the remote controller.
- Click on network app.
- Then you can see the saved file.
- You can open it and start watching content.
If you are using an STB Emulator, you need to make sure that you are having an appropriate IPTV Set-top box. Here are the compatible IPTV Set top boxes.
- MAG 200
- MAG 245
- MAG 250
- MAG 260
- MAG 270
- MAG 275
- Aura HD
You should next follow the below-mentioned instructions and get the job done.
- First download STB Emulator. You will be able to do it from the Google Play Store.
- Now you need to install STB Emulator.
- Now you need to click on Settings, which you can see on the top right hand corner.
- The click on Profiles.
- Now you need to select the Test Portal.
- You should now select STB Model.
- Enter the STB Model option.
- Go to Portal Settings.
- Enter the URL that you received in email under the field Portal URL.
- Now you need to click on Screen Resolution.
- Define the Screen Resolution as 1280 x 720.
- Exit from the app and restart.
- Now you can see the list of channels.